

Build Guide: The Morita-Ya Ramen Shop Book Nook
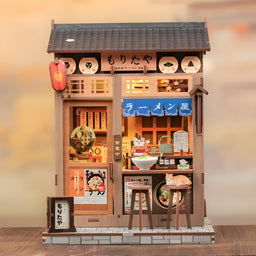
Morita-Ya is a traditional ramen shop rendered in a few inches of plywood: timber framing, noren curtains, a warm counter glow. It is one of the most satisfying builds in the range, and one of the easier ones to get wrong if you run the lighting last.
Here is the order that works.
What you need
- The Morita-Ya kit: everything structural is in the box, LEDs included.
- Wood glue. Slow-setting gives you room to adjust; fast-setting holds without clamping. Both work.
- A craft knife and a cutting mat.
- Tweezers for the small props.
- Masking tape or clothespins to hold glued corners square while they set.
- Batteries for the LED kit.
- Optional: fine sandpaper and a metal ruler.
Before anything else: test the LEDs and dry-fit the main structure. Two minutes that prevent the one mistake you cannot undo.
1. Unpack and organize
Check the inventory against the manual and group the parts into three piles: structure, decoration, lighting. Keep the manual open beside you and work in its order rather than the order things look interesting.
2. Assemble the structure
Floor first, then the walls. The only thing that matters here is that everything is square: check each corner against the base as you go, because an error at this stage grows through the whole build.
Use glue sparingly and wipe the excess before it sets. Dried squeeze-out is shiny and does not take paint.
3. Run the lighting: before you close the scene
This is the step people regret skipping. Plan a clean path for the wires, tack them down with a spot of glue, and test after every section.
The warm glow spilling out of the shopfront is the whole character of Morita-Ya. Once the facade is on, you cannot reach behind it.
4. Facade and decoration
Signage, lanterns, posters, the counter props. Pay attention to alignment on the pieces visible from the edge of the shelf: that is the angle most people will actually see it from.
5. Finishing
Clean up any rough edges, dust it off, drop the batteries in and switch it on. Then slide it between two books and step back.
Tips worth knowing
- Work in two or three short sessions. Precision and enjoyment beat speed, and the glue gets to dry properly between them.
- Less glue than you think. A thin line; capillary action does the rest.
- Dry-fit everything before committing.
- Personalize it. A light ink wash to age the timber, a few extra plants, hand-lettered menus: this is what makes it yours rather than the box's.
Common questions
How long does it take? Count on 3 to 5 hours overall, depending on your experience and how long you let the glue set.
Any special tools? No. A knife, glue, tweezers and batteries cover it.
Are the LEDs included? Yes, the lighting comes with the kit. Test it before gluing.
Can I paint or age it? Absolutely: a light patina strongly reinforces the old-shop feel.
Get the kit
Morita-Ya Ramen Shop Book Nook Kit. It also pairs well with Oishii Kyoto and Kirishima Cha-an if you are building a Japanese shelf: see our guide to Japanese book nooks.

Related Posts

The 5 Best Book Nooks to Give This Christmas

Japanese Book Nooks: Where Tradition Meets Miniature

Why a Book Nook Makes the Perfect Gift

How to Match Your Book Nook to Your Interior Style

How to Personalize Your Book Nook With Photos

DIY: Turn an Old Book Into a Book Nook


